
It is Christmas!!!!!
One of my favorite times of the year! And it just isn't Christmas in my household without a gingerbread house. My sister and I have loved watching the professional gingerbread house making contests on T.V. for years and they always inspire me to make one of my own. In the past, as my mother will tell you, I have let my imagination go way above and beyond my mediocre gingerbread house making skills, resulting in a gigantic, lopsided, unfinished mansion, complete with sticky sugar glass lake and a molded marzipan swan like creature.
This year I have taken a different, much simpler approach and I stayed in the "quality over quantity" state of mind. I love how my quaint little woodland cottage turned out!
I used this Martha Stewart Tutorial for the entire project. The recipe, the template, and the methods. One thing I did change was the size. I printed her template on 60% instead of 100%. Each individual piece looks so small but once you put it all together it makes such a nice manageable sized house.
I made a few changes here and there that I will touch on as well.
Cutting and Baking the Pieces
The best tip I can give you throughout the entire process is utilizing your freezer! After you roll your dough, pop it in the freezer for 5 minutes. It is so much easier to cut out your pieces when the dough is frozen. Right before you bake them, freeze for at least 10 minutes. The tiny windows wont close up and your cut outs will be the exact same shape once you bake them. I moved the door from the long horizontal piece to the taller pointed piece and made that my front. Just a personal choice!

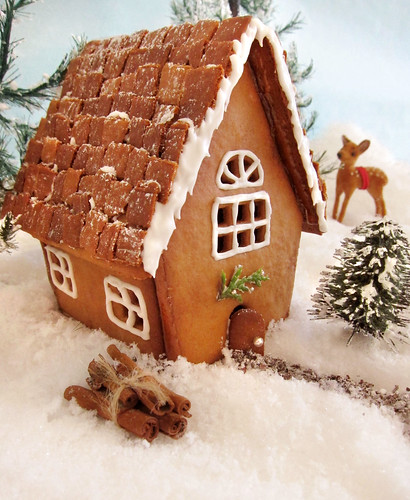
The Shingles
The Martha tutorial does not make individual roof shingles like I did. She pipes them on with royal icing. I really love how the gingerbread shingles look but they were by far the most time consuming thing. I wish I had taken pictures of this process but it is still fairly easy to explain. Roll some gingerbread dough over a silpat. I used a small 10 by 6 silpat. You want to roll the dough as thin as you can possibly get it. It doesn't matter if it sticks to the silpat, in fact it definitely WILL stick. So you roll and roll and roll until it is paper thin. With a knife, cut long crossing horizontal and vertical lines to create 1/2 squares. Freeze for 15 minutes. Bake at 350 for 3 to 6 minutes, depending on your oven. I let mine go a little into overdone territory because I wanted the roof to be dark. Once it cools, you can carefully break the pieces apart. You will have many casualties here and only about 3/4 will make usable shingles so make more than you think you need. I used about 75 per side. Another thing to look out for is the direction. I put my roof shingles on the opposite way than they should be. Does it really matter? No. But when you have a super "do it yourself" Dad who pretty much built your REAL house and will notice every inaccurate construction element, save yourself the lecture and put them on right! I also left out the chimney. Not by choice, I just forgot! I'm pretty sure my dog got a hold of the tiny chimney cutouts and ate them. I absolutely love how it looks on Martha's house though and would recommend making it!
The Sugar Syrup
Alright onto the next thing. In Martha's tutorial, she uses caramelized sugar to glue the pieces together instead of royal icing. Slightly more dangerous, but brilliant! This worked like a dream. You just carefully brush it along the edges and it hardens within a few seconds. Once you get the house put together, it is not going anywhere. I began to attach the roof shingles using the sugar and for the first 2 rows, things were looking good. But after a few minutes, the sugar syrup was starting to get hard. The syrup would harden before I could even get the shingles to to roof. After lots of reheating and a bunch of broken shingles I decided that the sugar syrup just was not the right medium for such a slow tedious job. I made a quick batch of royal icing (1 egg white, 1.5 cups powdered sugar) and finished the job that way. Much better.
With the leftover royal icing, I added a few details around the roof and windows, a festive sprig of rosemary above the door and a silver sprinkle doorknob. My favorite little trick here is the pathway! I used ground coffee mixed with a little powdered sugar and it looks just like gravel.
I'm so happy to be posting again. The new year always brings new inspiration. I hope everyone is having a wonderful day with their families and friends! Merry Christmas and Happy Holidays!