Showing posts with label chocolate. Show all posts

Saturday, October 11, 2014

Vegan Caramel Apples with Dark Chocolate and Pistachios


Almost 2 weeks into October and it is just now beginning to feel like fall around here. And one of my favorite fall time traditions is apple picking in Oak Glen with my mom and sister. Now, what to do with this abundance of apples? I say, drench 'em in caramel and chocolate! I used the apples from Oak Glen which are much smaller than regular store bought. This recipe makes enough caramel to double coat about 8 regular large granny smith apples.

The first thing you need to do is prep your apples. Wash and remove any waxy layer from the apples (of store bought). The wax will prevent the caramel from sticking. Remove apple stems and replace with your stick of choice. Twigs, skewers, popsicle sticks, chopsticks. You can pretty much use anything you've got handy.

Have a parchment lined tray ready to place the dipped apples on.

For the Vegan Caramel

1 cup Earth Balance vegan butter
2 cups organic cane sugar
2 cups soy or almond milk
1 cup organic corn syrup
1 tsp vanilla extract

In a large heavy bottomed saucepan, combine all ingredients except for the vanilla. Stir to combine and set over medium high heat. When mixture comes to a boil, reduce heat to medium low. Cook until temperature reads 245 degrees on a candy thermometer. You can also check the old fashioned way. After about 10 minutes, drop a bit of the caramel into ice cold water. It should be soft enough to chew but firm enough to form a ball and keep its shape. Once you reach this point, remove from heat and add the vanilla extract.

Transfer caramel to a large glass measuring cup. Let sit for about 3 minutes to cool slightly.

Carefully dip each apple in to the caramel and place on parchment. Let sit for a few minutes and dip again. Let sit for about 20 minutes.

For the Chocolate

1/2 cup dark chocolate
2 teaspoons coconut oil
1/4 cup finely chopped pistachios

Microwave the dark chocolate in 30 second intervals, stirring each time, until the chocolate is melted. Add the coconut oil. Dip 1/2 of each caramel apple into the dark chocolate. Sprinkle the chocolate with chopped pistachios. Set on parchment to firm up completely.


Tuesday, May 6, 2014

Vegan Raspberry Tarts with Vanilla Custard, Tangerine Caramel, and Chocolate Cookie Crust


Tangerine Caramel Sauce

1 cup almond, soy, or coconut milk (I used half almond, half coconut)
1/2 cup brown sugar
1/4 cup cane sugar
1 tablespoon organic corn syrup or brown rice syrup
1/8 teaspoon cream of tartar
2 tangerines, zested and juiced.
1/4 teaspoon sea salt.

Combine all ingredients in a medium sized, heavy bottom sauce pan. Bring to a boil over medium heat. You want the mixture to stay at a low to medium boil for about 15 to 25 minutes. The time depends on how thick you want your caramel sauce to be. 15 minutes will give you a drizzly caramel at room temperature. 25 minutes will give you the kind of caramel you need to heat before drizzling. Once you have reached the desired consistency, remove from heat. Add in the tangerine juice, zest, and salt. Stir to combine. If you accidentally take your caramel farther than intended, you can add a little extra almond, coconut, or soy milk to thin it out.

Chocolate Cookie Crust

1/3 cup cane sugar
1/2 cup Earth Balance, room temperature
3 tablespoons cocoa powder
1 1/4 cups all-purpose flour (for gluten free, use your favorite all-purpose GF mix)
1/4 teaspoon salt
2 tablespoons almond, soy, or coconut milk
1 teaspoon vanilla extract

Preheat the oven to 400 degrees F.

In a large bowl, cream together the sugar and the Earth Balance, until light. About 3 minutes. Add cocoa powder, flour, and salt. Mix to combine. Add milk and vanilla. You will have a fairly sturdy dough.

Press dough into desired tart pans. I used four 4-inch round tart tins. You can also make one large 9 or 10 inch tart. Using a fork, poke a few holes in the bottom on the crust to prevent air bubbles when baking. Refrigerate for at least 30 minutes.

Gently line the unbaked tart shells with foil. Place pie weights, uncooked beans or rice into center of foil lined tart shells to ensure they bake flat. Bake in preheated oven for 15 to 20 minutes, depending on size of tart shells. Tarts are done when edges are lightly browned. Let cool.

Vanilla Custard

3 tablespoons corn starch3/4 cup cane sugar
1 cup soy milk
1 cup coconut milk
1/4 teaspoon salt
1 teaspoon vanilla
2 tablespoons Earth Balance

Combine corn starch and sugar in a medium saucepan. Slowly whisk in the coconut milk and soy milk. Cook over medium high heat, stirring constantly, for about 7 to 10 minutes. Once the mixture reaches a boil, it will begin to thicken. Cook another minute or so. Add salt, vanilla, and Earth Balance. Stir to combine. Let cool.

To Assemble the Tarts

Spread a thin layer of tangerine caramel in the bottom on each tart shell. Add a layer of vanilla custard on top of the caramel. Top the tarts with fresh raspberries and tangerine zest. Drizzle with more caramel.


Saturday, March 29, 2014

Vegan Vanilla Chocolate Chip Ice Cream (without an ice cream machine!)


Vanilla Cashew Ice Cream Base

Ingredients
4 oz cashews, raw unsalted
2 1/2 cups water
1/2 cup raw sugar
1/3 cup agave syrup
3 tablespoons coconut oil, melted
1/4 teaspoon salt
1 vanilla bean (split lengthwise, seeds scraped)  or 1 teaspoon vanilla extract
1/4 teaspoon xanthan gum (optional, for texture)
1/4 cup chocolate chips (or any other add-ins you would like)


2 different sized large Ziploc bags (1 small enough to fit inside the other)
3-6 cups of ice
1/4-1/2 cup rock, kosher, or table salt

If you have the time, soak the cashews in the water overnight. Alternately, you can simmer the cashews in  the water for 15 minutes, cool slightly. Either way, reserve liquid. I think in this case, I prefer the simmer method. The warmth from the cashew water helps dissolve the raw sugar.

Place cashews, water, sugar, agave, coconut oil, salt, vanilla bean seeds, and xanthan gum in a blender or food processor. Blend on high until completely smooth. I use my Vitamix and it makes the cashew base super creamy.

If you do happen to have an electric powered ice cream machine, you can use this base and follow manufacturers directions at this point. If not...

Pour ice cream base into the smaller of the two Ziploc bags. I could only fit about half of the ice cream base into my smaller bag so I did this in two batches. Remove as much air as possible from the bag and seal it tightly and securely. Place this bag inside the larger zip lock bag. Fill the larger bag with enough ice to surround the smaller bag, with a little bit of room for movement. Sprinkle the ice with the salt and seal the bag.

*The salt actually lowers the melting point of ice, essentially allowing ice to be even colder for longer. Ice cream needs to be surrounded by temperatures lower than 32 degrees F in order to freeze. When you add salt to the ice, the melting point becomes lower than 0 degrees F. Science!!!

Now its time to shake. A lot.

I recommend a round of your current favorite show on Netflix. It helps pass the time while you shake away. This definitely takes a bit of elbow grease and it is nice to have another person to take turns with. My sister and I even tossed it back and forth like a weird game of catch. The bag gets cold. Like REALLY cold. And there is a lot of condensation. Wrap the whole thing in 2 or 3 towels. Gloves make this even easier. But you basically want to keep it moving until the mixture becomes mostly solid. The movement inhibits the formation of ice crystals.

Ice crystals=grainy ice cream.
 No ice crystals=creamy smooth deliciousness. 

This will take anywhere from 15 to 30 minutes. Once it reaches the desired consistency, remove smaller bag from ice and rinse off the salt water. Gently fold in the chocolate chips. You can either leave it right in the Ziploc bag or transfer to an airtight freezer safe container. Place into the freezer for at least an hour to finish the freezing process.  

Tuesday, January 18, 2011

Chocolate Panna Cotta

Chocolate Panna Cotta

So here comes another multi-component Cooking Channel inspired dessert. I think I was watching Unique Eats or something and the episode was all about candy. This one pastry chef (I really need to write down their names!) makes a fancy shmancy dessert called The Candy Bar. Each layer is a unique representation of elements from classic candy bars. There was a caramel peanut layer, a crunchy chocolatey kit kat type layer, etc. It looked really whimsical and delicious and I couldn't wait to come up with my own version. So I decided on 3 main components; chocolate panna cotta, chocolate cake, and my version of the crunchy kit kat layer I saw on the show. For the panna cotta, I used this recipe I found on Sugar Rush. The chocolate cake is just a standard recipe, you can use any cake you'd like.

The kit kat layer took some experimenting. The chef mentioned it was crepes, baked in the oven, crumbled and mixed with chocolate. So here is my recipe for the kit kat layer.

___________________________________________________________________
Chocolate Hazelnut Crunch

2 large eggs
3/4 cup milk
1/2 cup cold water
1 cup flour
3 tablespoons melted butter
1/2 cup Nutella
3/4 cup semisweet chocolate, melted

Preheat oven to 350 degrees.

In a medium bowl combine eggs, milk, water, flour and melted butter. Heat a sauce pan over medium low heat. Coat with cooking spray. Because these crepes are going to be baked and broken up, it really doesn't matter how they look. They can rip and tear, they can be underdone or over done. This is the most relaxing crepe experience you will ever have!!

Once you have cooked all your crepes, lay them on sheet pans, careful not to overlap. You will need about 4 separate sheets or you may need to work in batches. Bake at 350 for about 20 to 30 minutes. This can turn on you quick so keep an eye on them. If you notice the edges start to brown, carefully break them off with tongs.

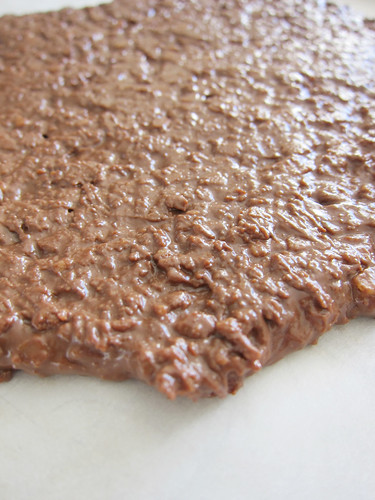
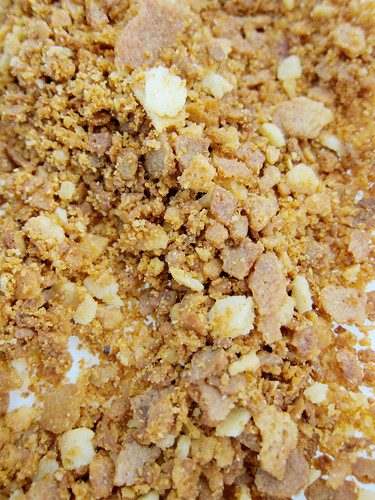
Once all the crepes are a nice golden color, place in a food processor and pulse till ground. Add Nutella and melted chocolate. Spread in a parchment lined 13x9 inch pan and cool in refrigerator. When ready to use, cut into whatever shape you would like, I used a 3 inch round biscuit cutter.

Once crumbled, the crepes should look like this.
blog 4

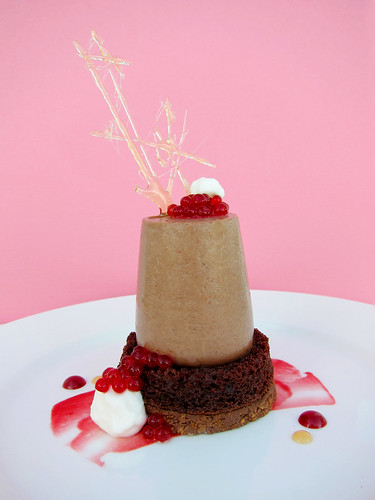
And this is the finished product

Blog 1
_____________________________________________________________


Some of the most interesting elements on the entire dessert were the garnishes. The chef topped it all off with a cherry "caviar" garnish. I have seen this plenty of times on T.V. but for some reason, this time, I decided to try it myself. I didn't even know if it was possible. Chefs these days have such a large arsenal of interesting tools and chemicals to create absolutely mind blowing desserts. And I don't know about you, but I don't have liquid nitrogen laying around in my pantry. So I sat at my computer, went to Google, and found this video.

I was still a bit apprehensive, but I can honestly say it was super easy and they turned out great! You basically drop little balls of slightly solidified jello into cold oil. The viscosity of the oil is what creates the sphere and the temperature is what sets the jello. So here is my modified recipe.

______________________________________________________
Black Cherry "Caviar"
Makes: About a cup

Special Equipment:

An 8 to 10 inch tall container, like a glass
A squeeze bottle or a dropper


Ingredients:

2 to 4 cups canola oil, depending on size of container
10 ounces water
15 pitted black cherries
2 teaspoons sugar
3 tablespoons cherry brandy
2 envelopes unflavored gelatin

Fill container with canola oil and place in freezer for about an hour. The goal is to get the oil really really cold, but just enough so that the oil is still liquidy. You know you've gone too far when the oil is the texture of loose Vaseline. But no fear, about 3 minutes on the counter and some stirring loosens it up again.

Meanwhile, place water, cherries, sugar, and brandy in a small saucepan. Bring to a boil and simmer for 10 minutes. Cool and puree in a blender. Strain through a fine mesh strainer. The idea here is to get 8 ounces of liquid from this. If you end up with less, just top it off with more water and cherry brandy. Once cool, sprinkle gelatin over the top and let bloom for about 10 minutes. Place back in saucepan over low heat just till the gelatin dissolves. If using a squeeze bottle, pour mixture into it now. Place in fridge until the mixture thickens slightly. You don't want any chunks or lumps. It should still be a fairly smooth liquidy mixture.

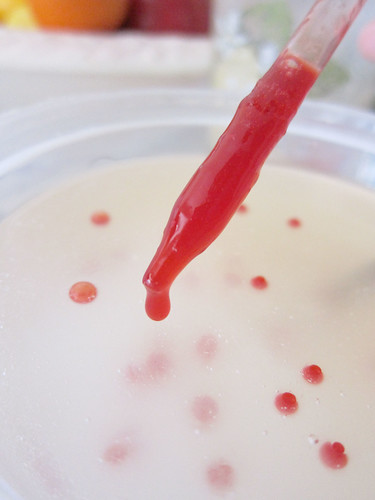
When oil is at the right temperature, you are ready to form the caviar. Using a dropper or squeeze bottle, gently drop small spheres into the oil. They will float right at the surface for a few seconds, then slowly fall to the bottom.

After you have done a few, get some out with a spoon and check the texture. If you are worried they aren't sturdy enough, feel free to add more powdered gelatin. Repeat the blooming, heating and cooling process and then keep making spheres till you have as many as you need. They can be kept in the oil overnight. When ready to use, carefully rinse them off with cold water.

I used a dropper that I just happened to find in my kitchen. It worked really well!
good one

Here they are!! The Black Cherry Caviar. I am quite pleased with them.
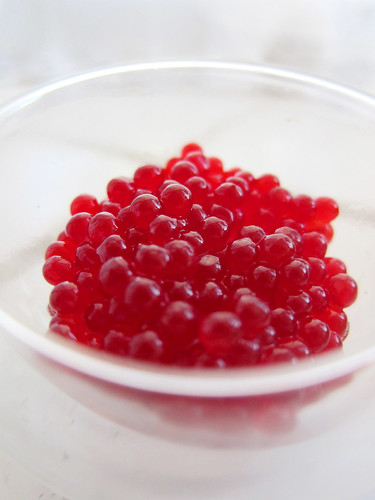
Black Cherry "Caviar"
________________________________________________________________


For assembly, brush some cherry preserves on the plate. Lay down the chocolate cake and crunchy hazelnut layer. Place panna cotta on top and garnish with caviar. I used this Alton Brown recipe to make some fun sugar decorations and with the remaining caramel, I made a quick caramel mousse to finish the whole thing off.

Although there are many components, each one is quite simple on its own. When they come together at the end it creates a really beautiful dessert! Perfect for dinner parties, Valentine's Day, or any occasion where chocolate is needed!